Pages

Thursday, 18 July 2013

Ecclefechan Tart

During one of my recipe hunts on the internet, I came across this recipe for Ecclefechan Tart. I hadn't heard of this tart before, but I was very much intrigued by the recipe, and thought it sounded delicious. 

For the pastry:
  • 250g plain flour
  • 125g unsalted butter
  • Pinch of salt
  • 50ml whisky

For the filling:
  • 150g unsalted butter
  • 150g light brown sugar
  • 3 large eggs
  • 150ml double cream
  • 1 tablespoon black treacle
  • 300g mixed dried fruit
  • 1 teaspoon finely chopped stem ginger
  • 1 lemon
  • 1 orange


I was particularly interested in the concept of the whisky pastry. Being a lover of whisky, I just coudn't wait to give this a go. I even sacrificed some whisky from my own collection:


Mmmm, Jura Superstition. Yum!


I preheated the oven to 180°C before making a start on the tart. The pastry was quite a tricky one in the end. I rubbed the flour and the butter together as usual, to create a breadcrumb-like mixture. Now, usually when I make shortcrust pastry, I use beaten egg to bind the ingredients together. However, there was no egg in this recipe, but 50ml whisky instead, which seemed to make the pastry a little difficult to handle at times - it had a nasty habit of falling apart, but I eventually got it to work well enough. I must admit, there was some patching required, but it all came together, just about.

Pressing it into the tart tin, the base was then pricked with a fork, before being covered with baking paper and filled with baking beans. It was then baked for 10 minutes in the oven, after which the baking beans were removed and the pastry baked for another 5 minutes.


Whisky pastry - what a great idea.


Once the pastry had baked, the base was drizzled with delicious treacle.


It started off smartly before descending into a mess.


Then it was on to making the filling.  First the butter and light brown sugar were creamed together.


So much sugar and buttery goodness.


Then the eggs were mixed in, before the double cream was aslo added and mixed in.


Doesn't look too inviting yet.


Next I filled the pastry case with mixed dried fruit (and glace cherries), and then grated lemon and orange zest on top.


Looking good.


The cream mixture was then poured on top (carefully). I found that the quantities described in the recipe produced more of the cream mixture than was actually needed, so there was about a third of it left over in the bowl after I'd added it to the fruit.


Ready for the oven.


The tart was then baked for 40 minutes (the recipe calls for 30 minutes, but I found that it needed an extras 10 minutes before it was fully-baked). It came out of the oven looking rather nice.


Mmm, looking very nice indeed, and it smelt amazing.


I moved it to a cooling rack and then let it cool for half an hour before cutting out the first slice (my mum had demanded to try it).


Cooling and still smelling amazing.


Once a slice had been cut out for my mother, I took it into work with me, where is was pronounced as a success. The combination of the fruit, citrus zest and cream was beautiful, and the whisky pastry was lovely. As there was no egg in the pastry, it had a very different texture to that of normal shortcrust pastry; instead it was more of a biscuity texture, that was actaully very pleasant. Another success at work, it was left on a counter in the work kitchen for people to help themselves, and I found that it had gone completely after just fifteen minutes.


Yum!


Beckie.

Monday, 8 July 2013

Honey Cake Mark II

As my parents had returned from Norway and Iceland, it was back to stealth-baking for me, which can really only be done when they are both at work. Alas, this means that my baking is limited to two days a week. Still, I make a go of it.

I wanted to have a go at making a different honey cake this time, having had the urge for some for a while. I absolutely adore honey, so this was the perfect type of cake for me to make. I had made the Martha Kearney Hive Cake before, but wanted to try making a honey cake, rather than one that included lemon as well.

So yet again I turned to the BBC Food website, and typed in the words: "honey cake". The first result that came up was this James Martin recipe, and it seemed nice enough, so that's the one I went for.

The ingredients needed for the cake are:
  • 170g/6oz clear honey 
  • 140g/5oz unsalted butter 
  • 85g/3oz light muscovado sugar 
  • 2 eggs, beaten
  • 200g/7oz plain flour, sieved
  • 2 1/4 tsp baking powder
  • water
And for the icing:
  • 55g/2oz icing sugar 
  • 1 tbsp clear honey 
  • hot water

The BBC recipe calls for the use of self-raising flour, but I didn't have any in, and I prefer to use plain flour and baking powder anyway. So I simply added some baking powder to the 200g of plain flour.

So first I lined a cake tin with baking paper (being fed up with the number of times that I haven't greased the tin enough and have had to scrape cake off the tin base), and set the oven to 180C (350F/Gas Mark 3).

I then put the butter, honey and sugar, with a tablespoon of water, into the large saucepan and melted it slowly over a low heat.


Looks weird, but smells amazing.


Once melted, I then removed the pan from the heat, and mixed in the beaten eggs and the flour and baking powder, using a hand-held electric whisk.


Beaten eggs, and flour and baking powder.


The mixture was then poured and spooned out into the lined cake tin, and was then put in the oven for 40 minutes.


Looking good so far.


Once the cake had cooled down slightly, but was still very warm, I mixed up the icing sugar with the honey and hot water, and poured it over the cake.


Mmmmmm.

Once the cake had cooled a bit more, and the icing had set a little, I removed the cake from the tin and set it to rest on a cooling rack.


It smells really, really good at this stage.


As soon as I could, I cut myself a slice. As I said, I absolutely love honey, so this cake was heaven to me.It tasted purely of beautiful honey, and the combination of the honey sponge and the honey icing was not too much for me, although I could see how it would be for other people. Case in point, my mother hated this cake, and my father wouldn't even try it (he doesn't like honey). I'm used to this anyway, plus it meant more cake for me, so I wasn't too upset by this. I made this cake three days ago, and there is only a quarter of it left. It's provided me with a very nice breakfast!


Glorious cake!


Beckie.

Thursday, 4 July 2013

Baking For Birds

OK, so this blog is meant to be dedicated to the fine art of baking for humans, but I thought that today it would be interesting to look at some other craft-like stuff I have been getting up to.

Since moving back home, one of the joys of the day has been watching the wonderful array of wild birds that visit my parents' garden.  The visitors include Sparrows, Blackbirds, Robins (my favourite!) Blue Tits, Coal Tits, Great Tits, Chaffinches, Bullfinches, Greenfinches, Linnets, and even a Greater Spotted Woodpecker. Plus, there are a seemingly never-ending number of Starlings.

My parents' both love these garden-visitors, and for years have spoilt these birds rotten, buying a huge number of bird treats every single time they go to a garden centre.  The last two weeks, my parents have been in Norway and Iceland (they have such a hard life sometimes...), so I decided that this would be the perfect time to experiment with the bird treats. I thought that they would be fairly simple to make, and I was right. However, I still thought it best to have a look around online to see if I could find some guidance.

I found this blog post by


This is the sort of thing that I was aiming for:

Nice and tasty suet treat for all the little birdies...

Now obviously I was never going to get something that looked as perfect as this, but I was willing to take a shot at it.  First, I gathered together the items that were going to make up the bulk of the treat. I picked up a pack of mixed dried berries from good old Sainsburys, and chopped them up into smaller pieces. I mixed these in a bowl with some chopped (unsalted and un-roasted) peanuts, and some sunflower seed hearts.


Mmmm, delicious?

So I had my main filling sorted. Next was creating the fat that was going to hold the whole thing together. I decided to use some simple lard (all of 49p per block), and melt it down before adding it to the berry/nut mixture.


Oh good, lard.

I went right ahead and melted an entire block of lard in a medium-sized saucepan, on a low heat.


That's a lot of lard...

One thing I will say about this: melted lard absolutely STINKS. It smells truly awful, and I had to have the extractor fan on and all  the kitchen windows open in order to clear the smell. Thank goodness it melts quickly. The post by movita beaucoup calls for the addition of peanut butter at this stage, but the only peanut butter I had was a cheap basic one that is chock-full of salt. Excess salt is extremely bad for birds, so I decided to leave out the peanut butter until I can get hold of/make my own unsalted version.


Nicely melted. Still smelly.

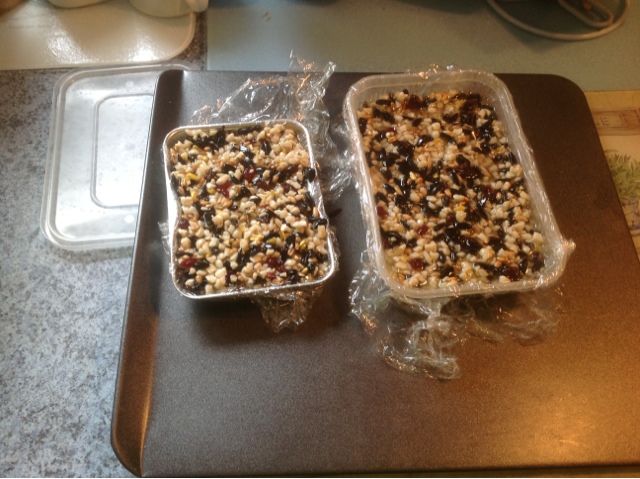
The melted lard was then poured into the bowl with the berry and nut mixture, and stirred together to create a cohesive mixture. Before pouring this all out again, I made sure that the 'molds' were prepped. This molds consisted of a Tupperware container, and a small butter-dish lid. These were lined with clingfilm, to make it easier to remove the mixture once it had set.


Totally legitimate molds there.

The mixture was then poured out into the molds, and placed in the fridge to set.


Looks promising so far.


Once set, the clingfilm ensured that the treats were very easy to remove from the molds, and also to store in the fridge until they are needed.


Ta-dah! Completed bird treats.


I also created a second batch that had the addition of half a jar of honey, which I had read would be enjoyed by the birds.


Honey and lard - such a delicious combination.

I also added a great deal more berried to this mixture in the hope of creating a really sweet treat for the birds.


More berried, peanuts and sunflower seeds.

I also made the batch slightly bigger, so it produced double the number of treats.


Four bird-friendly treats.

Once the treats had set, I put one into one of our many, many bird treat holders, and hung it out on the bird table.


A square bird treat holder.

Our garden is an absolute paradise for wild birds, and they are thoroughly spoilt by my parents. I waited anxiously to see if the home-made treats were as successful and/or popular as the shop-bought ones.


So many bird-feeders and treats!

Well, I am very pleased to be able to tell you that the first treat was completely demolished within 24 hours, and that all the other home-made ones I have put out have followed suit. The treats that incorporated honey have proved to be very popular indeed. These treats are most popular with the Blackbirds, the Starlings, and the Robins, which makes me very happy indeed. I can definitely recommend having a go at making your own bird treats, as it's really very rewarding indeed when they are obviously enjoyed by so many of the birds.

Beckie.